This guide explains how to use Aelyna® Keys, step by step and without technical jargon. For the technical details see Security; for the most common problems see the FAQ.
Development version. Aelyna Keys has not been released yet. This guide describes the app as it is today; where a feature is not ready yet we say so clearly. The screenshots were taken with sample data and still show the old logo ("Aelyna®" with the words "PASSWORD MANAGER"): the rest of the interface is the same.
Three things to know before you start
Aelyna Keys keeps your passwords in a vault: an encrypted file that stays on your computer. No server ever sees it, not even ours. To open it you need:
| What | Where it is | What happens if you lose it |
|---|---|---|
| Master password | Only in your head (and, if you like, handwritten on the Emergency Kit) | Nobody can recover it, not even us |
| Secret Key | Stored on this computer and printed on the Emergency Kit | You find it on the Kit |
| Hardware key (optional) | A USB or NFC security key | You use the backup key or the recovery code |
The most important rule: print the Emergency Kit and keep it somewhere safe, away from your computer.
Installation
You need Windows 10 or 11, or macOS 12 or later (Mac with Apple Silicon or Intel).
The installation packages are not available yet: they will arrive with the first public release, on aelynakeys.com/en. Download Aelyna Keys only from the official website.
Windows
- Open the downloaded installer. Windows shows the name of the verified publisher: if it says "Unknown publisher", do not continue.
- Choose the language (Italiano or English) and accept the licence agreement.
- The suggested folder is fine for almost everyone. No administrator rights are needed: the app installs for your user only.
- Choose whether you want a desktop shortcut and a Start menu entry.
- At the end leave "Launch Aelyna Keys" selected.
If you ever uninstall the app, your vaults are not deleted unless you explicitly ask for it (the default answer is No). Make a backup first anyway.
macOS
- Open the downloaded disk image (
.dmg). - Drag the Aelyna Keys icon into the Applications folder.
- Open the app from Applications. The app is signed and notarised by Apple, so it opens without warnings.
First launch
On first launch a five-step wizard creates your vault.
1. Welcome. Choose Create a new vault, or Restore from a backup if
you already have a .aelyna-backup file (see
Restoring a backup).
2. Master password. Give the vault a name (for example "Personal") and choose the master password:
- it must be at least 12 characters long with strength at least "Good": the meter below the field tells you as you type;
- the best advice is a phrase of 4–5 uncommon words, easy to remember and hard to guess. The Generate a strong passphrase panel, below the fields, makes one for you: choose how many words (4–7), the separator, the Italian or English word list, capital initials and a digit, press Generate (or Regenerate) and then Use this phrase, which fills both fields. Write it on paper before you continue (and later by hand on the Emergency Kit). The same panel is in Settings → Master password → Change the master password…;
- nobody can recover it if you forget it, not even us.
When you press Create the vault the vault is written to disk: there is no going back from here.
3. Secret Key. You see your Secret Key for the only time (more on it in the next section). Press Save the Emergency Kit (PDF)…, then tick I have saved the Emergency Kit and the Secret Key: you cannot continue without confirming.
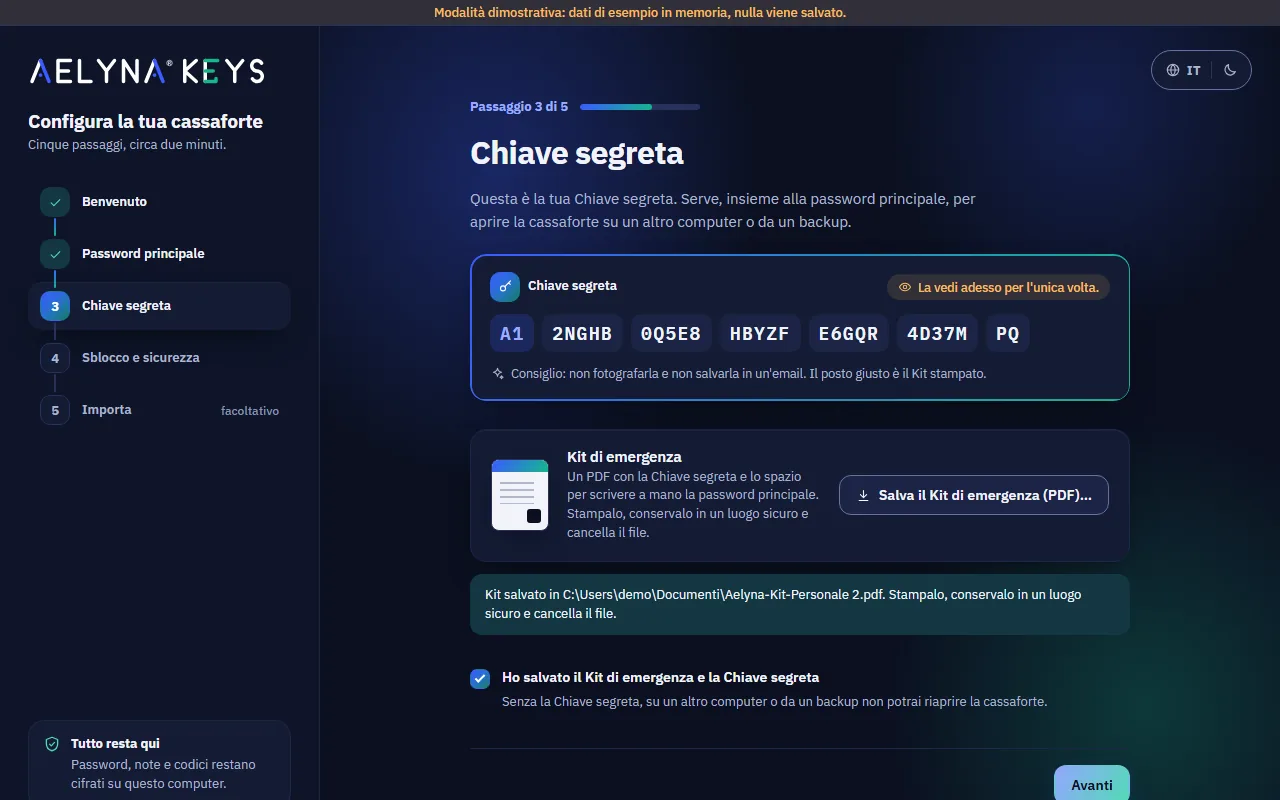
4. Unlock and security. All optional, and you can change them whenever you like in Settings:
- Lock automatically after a period of inactivity (default: 5 minutes);
- Hardware key: Later, from Settings or Add it now (see Hardware key);
- Quick unlock with Windows Hello: Turn on with Windows Hello, then confirm the master password and your Windows fingerprint, face or PIN (see Quick unlock). On macOS (Touch ID), in Remote Desktop or if Windows Hello is not set up the app tells you "Quick unlock is not available on this computer" and why;
- Anonymous installation statistics: already on, with an explanation of what is sent; you can turn them off right away (see Anonymous installation statistics).
5. Import. You can import passwords from another program at any time from Tools → Import and export (see Importing). Press Skip.
All set. Press Open the vault.
The Secret Key and the Emergency Kit
The Secret Key
It is a long random code, like A1-7K3QZ-M9XRT-…, created together with
the vault. It is needed together with the master password.
Why it exists: a password made up by a person, even a good one, can be guessed by a powerful computer if someone steals the vault file. The Secret Key adds a piece that cannot be guessed. So stealing the file is not enough.
On this computer the Secret Key is kept in the system keychain (Windows Credential Manager or the macOS Keychain): you do not have to type it every time. You only need it:
- on a new computer;
- to restore a backup on a computer where it is not stored;
- if the system keychain has been erased.
The Secret Key is never included in backups.
The Emergency Kit
It is a one-page PDF with:
- the name of the vault and the date;
- the Secret Key, written out and as a QR code;
- an empty space to write the master password by hand;
- instructions for opening the vault on a new computer.
What to do:
- Print it (for now the Kit is in Italian only).
- If you like, write the master password by hand in the space provided. It is your call: if you do, the Kit becomes as valuable as the vault.
- Keep it in a safe place, away from the computer: a locked drawer, a safe-deposit box, at the home of someone you trust.
- Delete the PDF file from the computer (and empty the trash).
You can save a new Kit at any time from Tools → Backup → Emergency Kit, with the vault open.
If you turn on the hardware key, the Kit alone is no longer enough to open the vault: you also need a registered key or the recovery code. The new Kit says so plainly.
Unlocking and locking the vault
Unlocking
Type the master password and press Unlock. If Caps Lock is on, the app tells you.
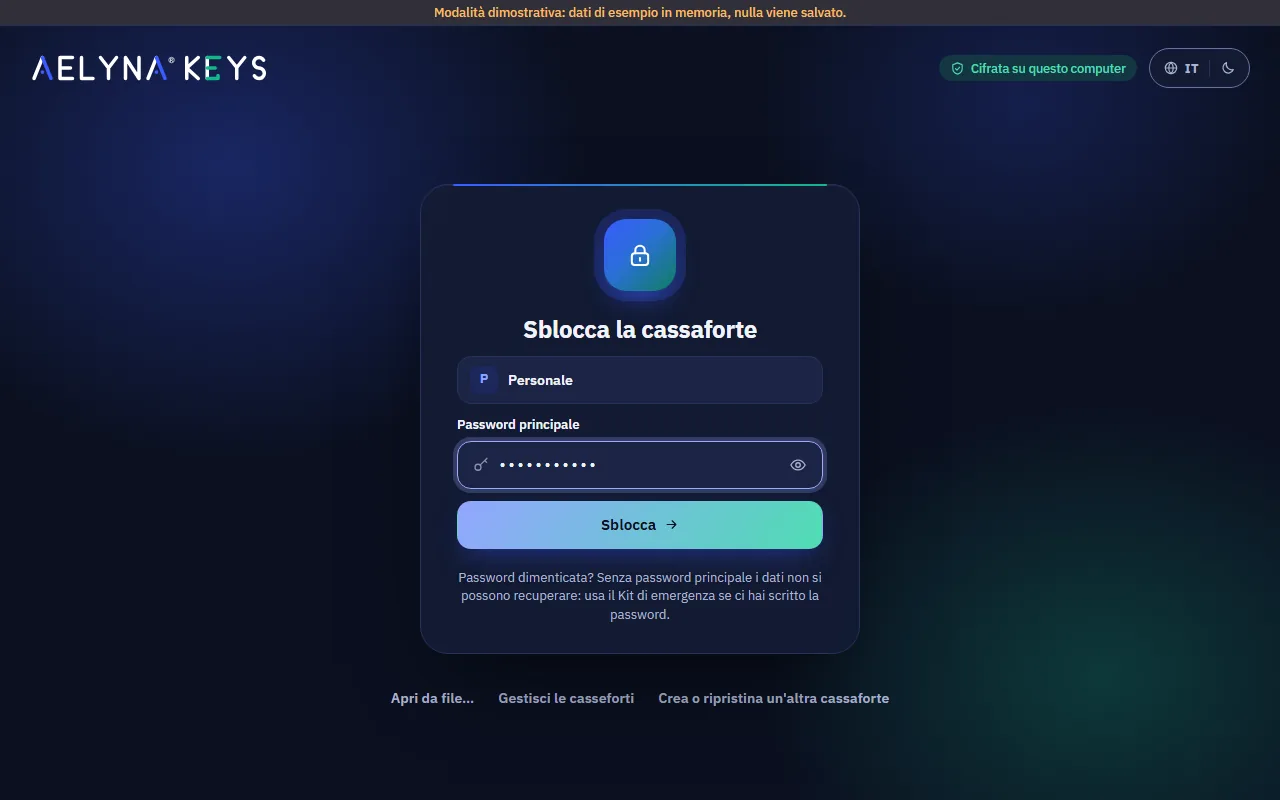
- Wrong password: you see "Incorrect master password or Secret Key." After 5 mistakes the app makes you wait longer and longer between attempts (from 30 seconds up to 15 minutes).
- New computer: if the Secret Key is not on this computer, the app asks you to type it from the Emergency Kit. Case, spaces and dashes do not matter. After unlocking it is saved in the system keychain.
- Hardware key on: after the password the app asks you to touch the key (see below).
- "Older copy of the vault": the file is older than the last one opened on this computer. It happens if you put back a file from a copy, but also if someone replaced it on purpose. If you do not know why, press Cancel.
Quick unlock with Windows Hello
On Windows you can open the vault with your Windows fingerprint, face or PIN instead of typing the master password every time. It is a convenience, not extra protection: the master password is still required.
Turning it on. Settings → Security and unlock → Quick unlock with Windows Hello (or at step 4 of the first launch): press Turn on with Windows Hello, type the current master password and confirm in the Windows dialog. If you cancel it, quick unlock is not turned on. Unticking it turns it off: Aelyna deletes the Windows Hello key it had created for this vault.
Using it. On the unlock screen press Unlock with Windows Hello. If the check fails you can try again or type the password.
You are still asked for the master password:
- at the first unlock after a restart of the computer (or after signing out of Windows);
- when it expires: every 14 days, or after the number of days chosen in With quick unlock, ask for the password every (from 1 to 30). Fewer days apply at once, more days from the next time you turn it on;
- after 5 failed attempts in a row with Windows Hello (Cancel does not count);
- for sensitive operations (changing the password, hardware key, backups, exports), which always ask for it.
Quick unlock is not available with the hardware key on, in a Remote Desktop session, if Windows Hello is not set up (Windows Settings → Accounts → Sign-in options) and on macOS: Touch ID is not supported yet. The setting shows the reason.
Locking
The vault locks:
- when you press Lock at the bottom of the sidebar (Ctrl+L, ⌘L on Mac);
- after the chosen inactivity time;
- when the computer goes to sleep, when you lock the screen or switch user;
- if you choose so, when you minimise the window;
- when you close the app.
On locking, the clipboard is cleared (if it still holds a value copied from Aelyna) and the keys are wiped from memory.
Multiple vaults
You can have several vaults, for example a personal one and a work one, or one kept on a USB drive. Only one is open at a time: opening another one locks the current one.
The list of known vaults appears on the unlock screen (Manage vaults) and in Settings → Vaults; from the sidebar, Switch vault locks the open one and takes you to the choice. For each vault you can:
- Unlock this one (on the unlock screen) or Open (in Settings): choose it;
- Rename: only changes the name Aelyna shows, the file is not renamed. Leave it empty to go back to the file name;
- Remove from list: after you confirm, the vault disappears from the list, but the file stays where it is and is not deleted. The open vault cannot be removed: lock it first.
Opening a vault from another location (a USB drive, another folder):
press Open from file… and choose the .aelyna file. The file stays where
it is and appears in the list as "Outside the default folder". If it is the
first time you open it on this computer you will need the Secret Key from
the Emergency Kit. Two copies of the same vault cannot be in the list
together: remove the other one first.
If the vault is on a USB drive, lock it before unplugging the drive. New vault… creates another one with the first-launch wizard.
Items
Everything you save is an item. There are four types:
| Type | What it holds |
|---|---|
| Login | Title, website, username, password, 2FA code, notes |
| Secure note | Free text (Wi-Fi codes, security answers…) |
| Card | Cardholder, number, expiry date, CVV, PIN |
| Identity | Name, personal details, address, document with expiry date |
You can add custom fields to any item, visible or hidden (for example a customer code or a PIN), a folder, tags and the favourites star.
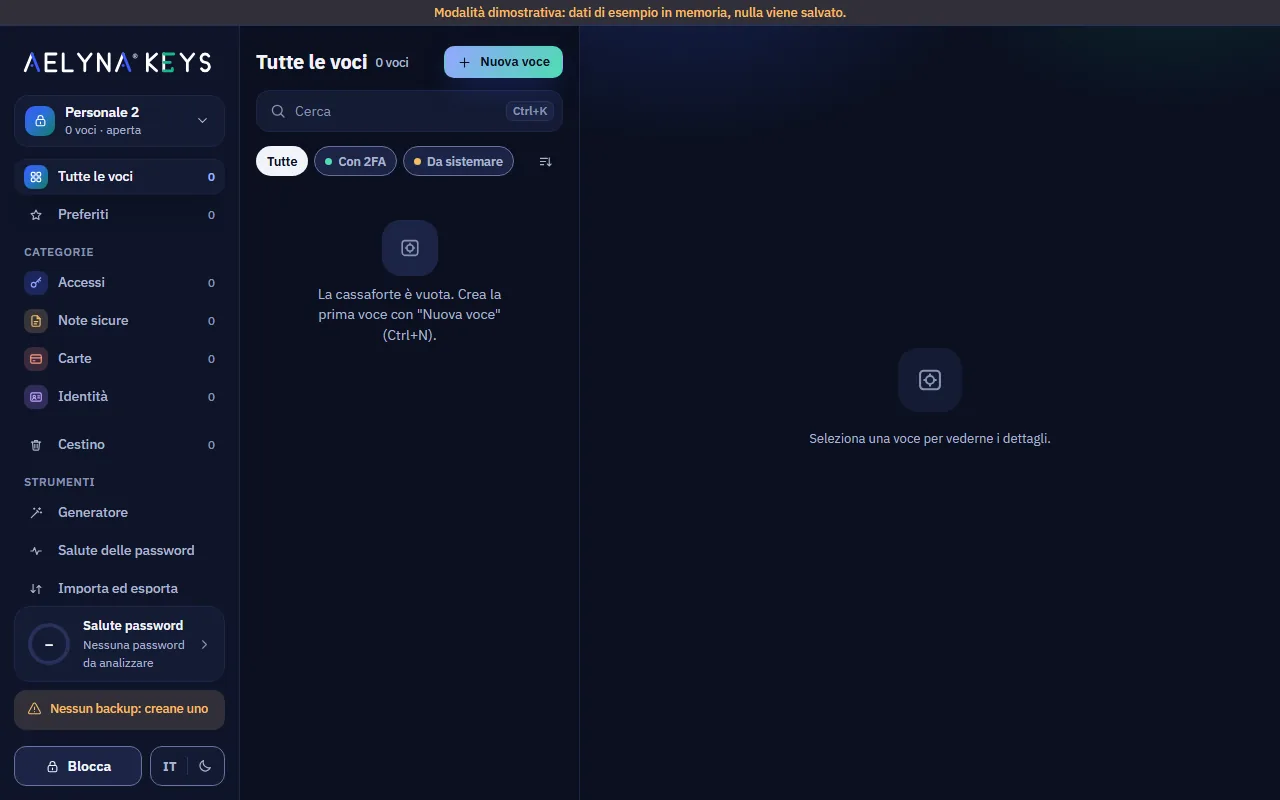
Creating and editing
- Press New item (Ctrl+N, ⌘N) and choose the type.
- Fill in the fields. Next to the password, Generate creates a strong password.
- Press Save (at the bottom, always visible).
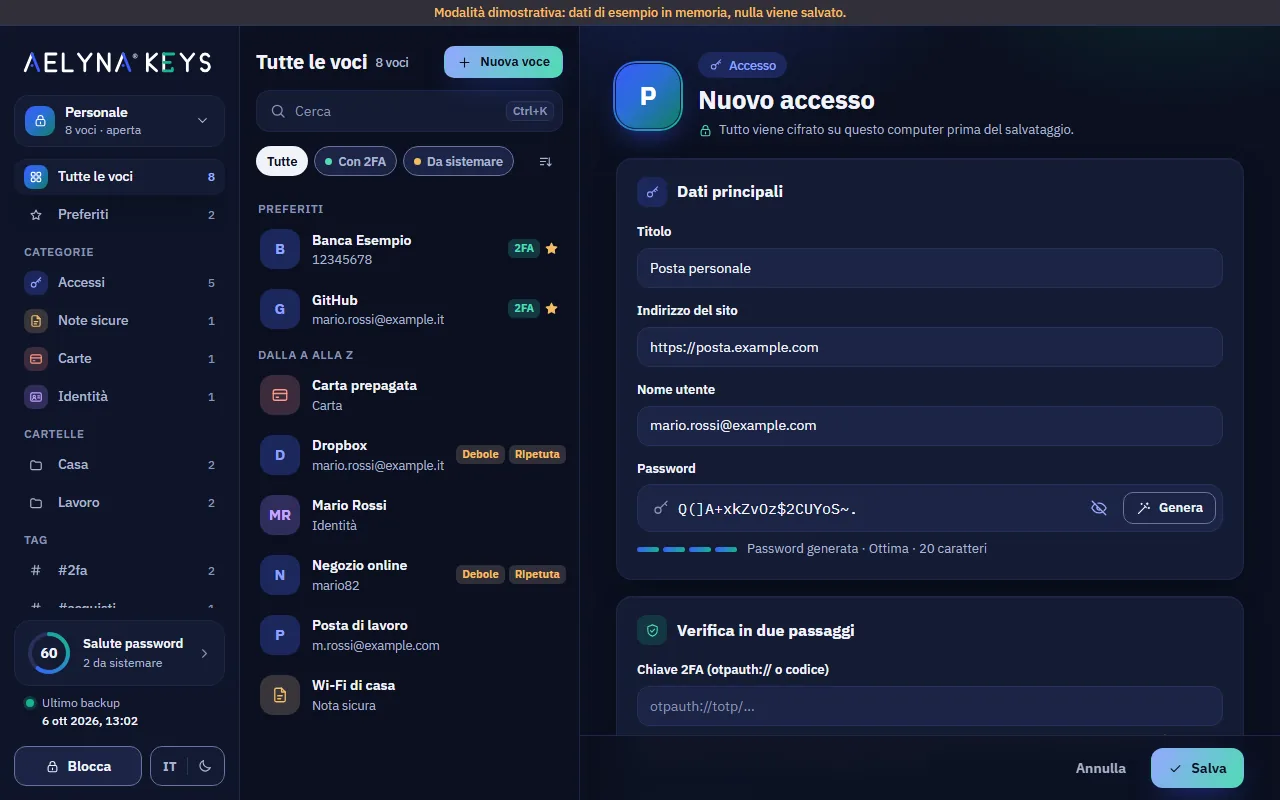
To edit, open the item and press Edit. Secret fields that are already saved (password, CVV, PIN, 2FA key) appear empty: leave them empty to keep them, or type the new value.
When you change the password of a login, the previous one stays in the history ("Previous passwords") in the item details: useful if a website has not accepted the change yet.
Searching
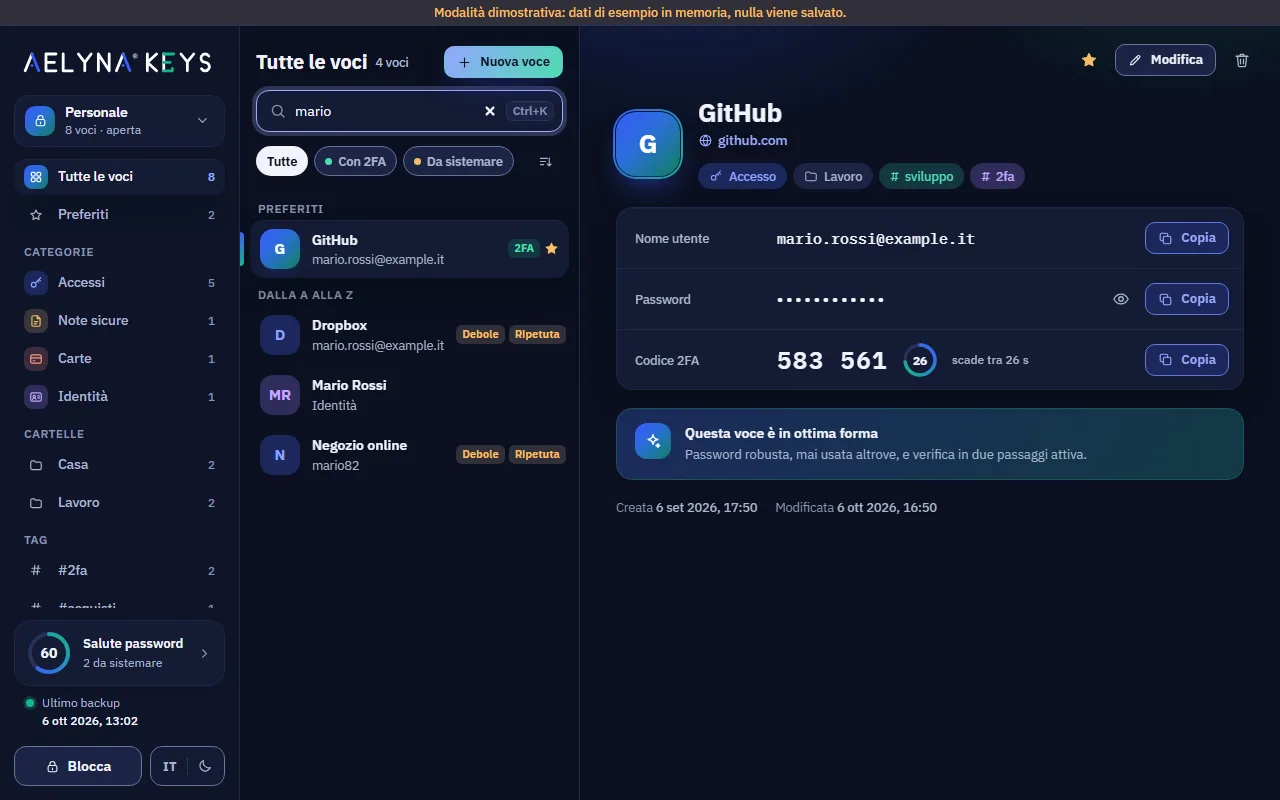
Press Ctrl+K (⌘K on Mac) and type: the search looks at title, username, websites, tags and folder. Choose the item with the arrow keys and open it with Enter. In the sidebar you can filter by type, folder, tag or favourites.
Copying and showing
Secrets are hidden until you press Show. The Copy button puts the value on the clipboard, which clears itself after 30 seconds (the notice at the bottom shows the countdown). On Windows copied passwords do not end up in the clipboard history (Win+V) or in the synced clipboard.
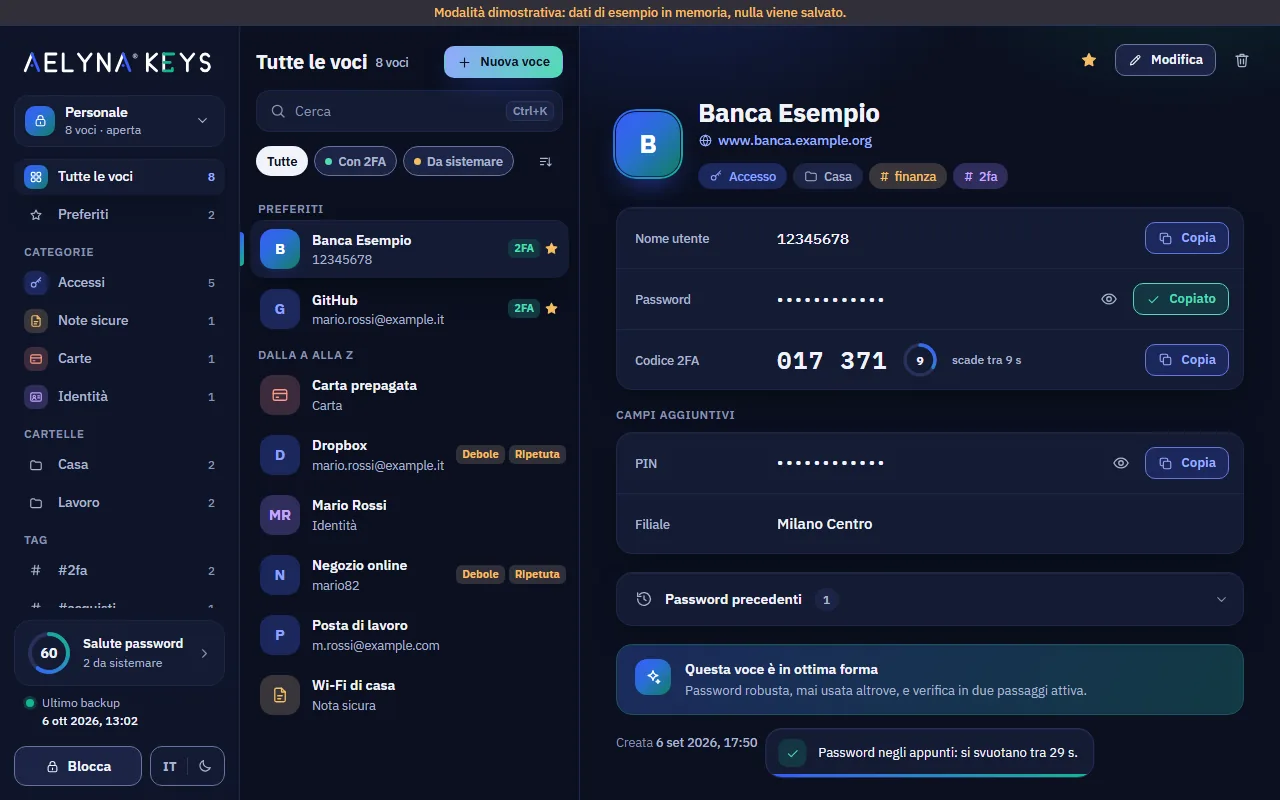
Shortcuts with an item selected: Ctrl+B copies the username, Ctrl+C the password, Ctrl+Shift+C the 2FA code, Ctrl+R shows or hides the password (on Mac ⌘ instead of Ctrl).
Trash
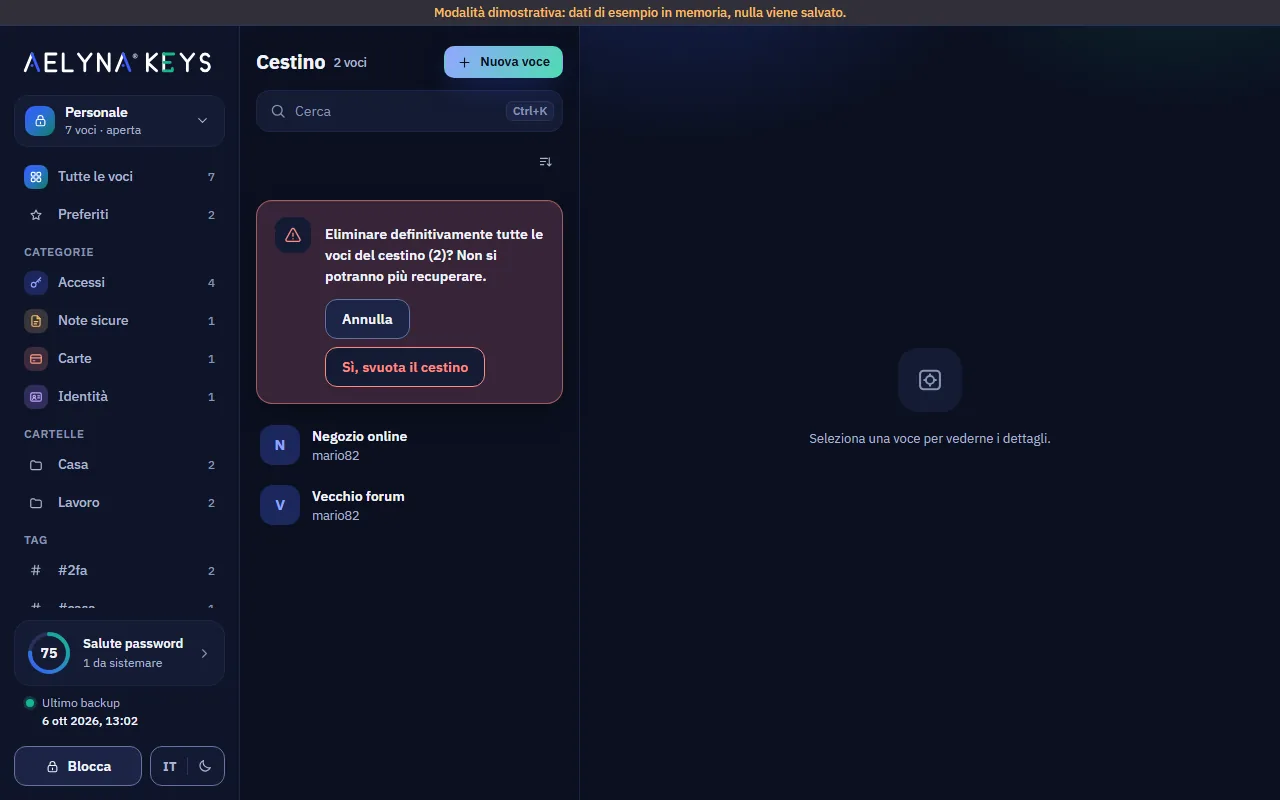
Move to trash does not delete right away: from the Trash you can restore the item or delete it permanently. Empty the trash asks for confirmation, and a deleted item can no longer be recovered.
2FA codes
Many websites offer two-step verification: besides the password they ask for a 6-digit code that changes every 30 seconds. Aelyna Keys can generate these codes instead of an app on your phone.
To add one to a login:
- On the website, turn on two-step verification: a QR code appears.
- In Aelyna edit the login and press Scan QR next to the 2FA key
field. Choose where to read it from:
- From the screen: with the QR visible on screen, Aelyna captures the screen once, only to look for the QR, and does not keep the image;
- From the clipboard: first copy the QR image (Win+Shift+S or Copy image in the browser);
- From a file…: a PNG, JPEG or BMP image saved on the computer.
- Check the website, account and code found and press Use this code (or Discard).
- Save. The details show the code with a ring that empties; in the last 5 seconds it turns amber. Press Copy and paste it into the website.
If the QR cannot be read, look on the website for the link "Can't scan
the code?" (or similar): the website shows a text key to paste into the
2FA key field (16 or more letters and digits, or the otpauth://…
address). On macOS only From a file… works today.
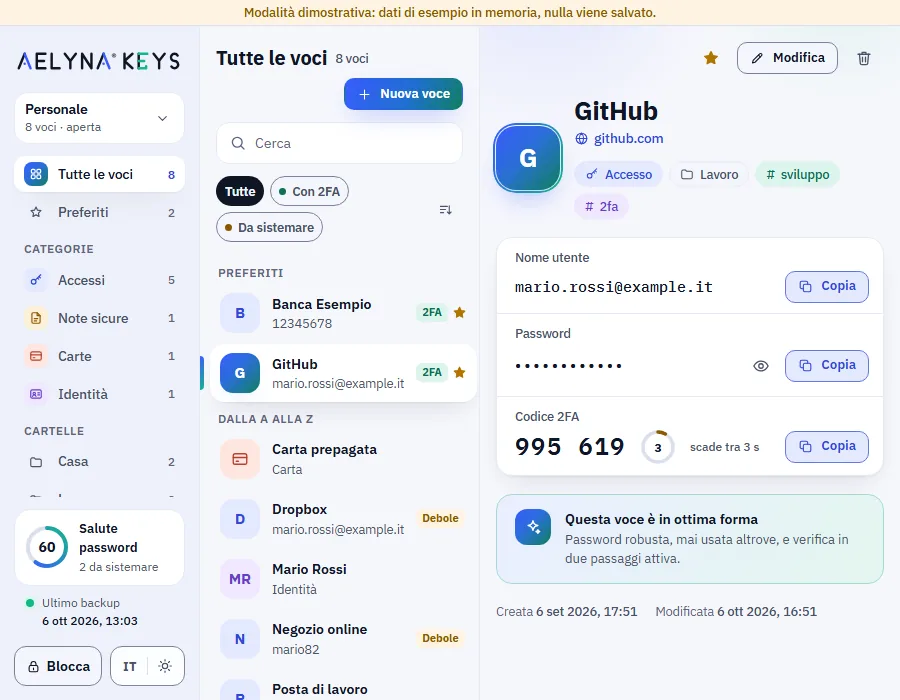
Keeping the password and the 2FA code in the same place is convenient, but if someone opens your vault they have both. For your most important accounts (main email, bank) you may prefer a separate app on your phone.
FIDO2 hardware key and recovery code
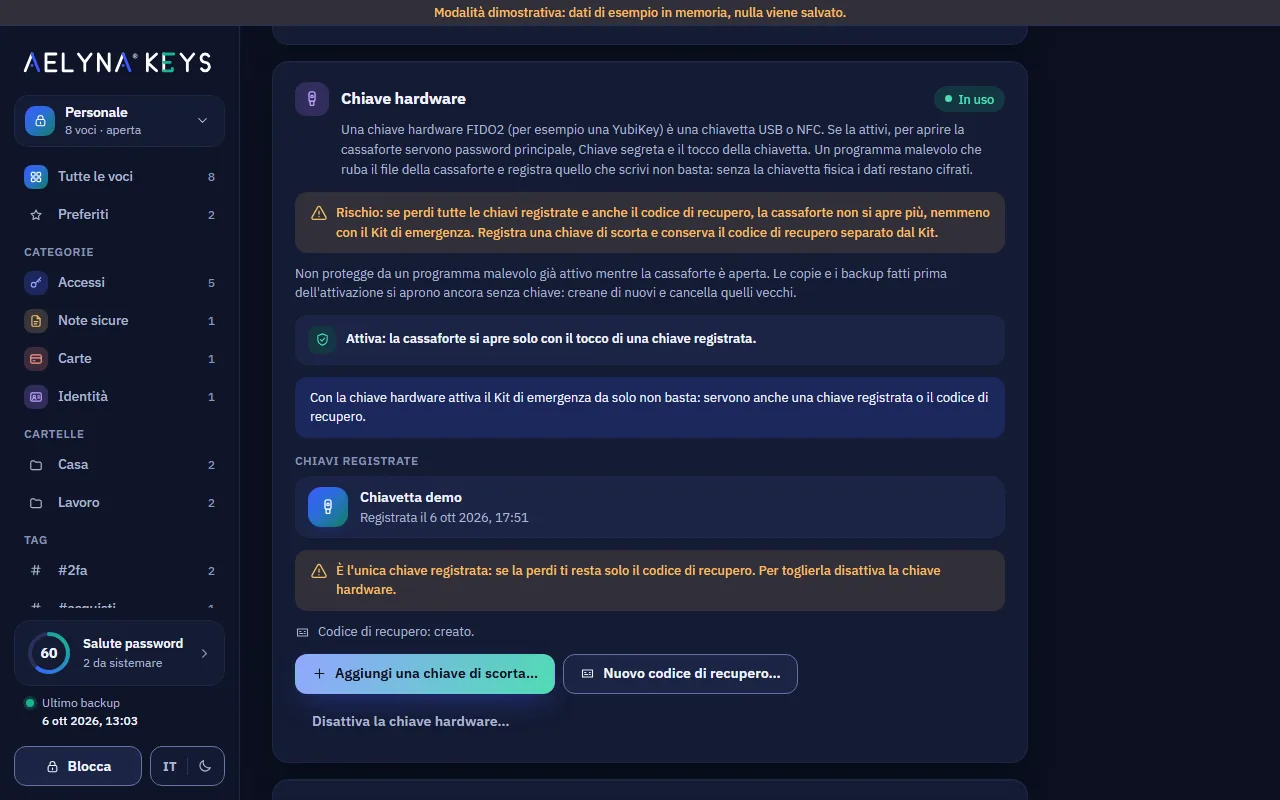
A hardware key (for example a YubiKey) is a USB or NFC security key. If you turn it on, opening the vault takes the master password, the Secret Key and a touch of the key. So even malware that steals the file and records what you type is not enough: without the physical key the data stays encrypted.
You need a FIDO2 key that supports the hmac-secret extension and has
a PIN set (you set it with the manufacturer's tool, for example Yubico
Authenticator). Windows Hello and your phone cannot be used as a hardware
key.
Before you turn it on
- Keep pen and paper at hand: you will see the recovery code only once.
- If you can, get two keys: a main one and a backup one.
- Be aware that backups made before turning it on still open without the key: afterwards you will make a new one and delete the old ones.
Turning it on
- Settings → Hardware key → Turn on the hardware key… (or Add it now at first launch).
- Read the notice and press Continue.
- Give the key a name, if you like (for example "Blue YubiKey"), and type the current master password.
- Plug in the key and press Register and turn on. When it blinks, touch it: it takes two touches, one at a time. If the system opens a window (it does on Windows), follow its instructions, including for the PIN. You have 60 seconds for each touch.
- The recovery code appears (it starts with
R1-). Write it down or print it and tick I wrote it down or printed it and I do not keep it on this computer.
Then the app suggests the next steps, in this order:
- Register a backup key (Add a backup key…): plug in both the key already registered and the new one; touch the registered one first, then the new one twice. You can register up to 4 keys.
- Create a new backup and delete the old ones.
- Save a new Emergency Kit.
Quick unlock with Windows Hello is not available while the hardware key is on: if it was on, turning on the key removes it.
Unlocking with the key
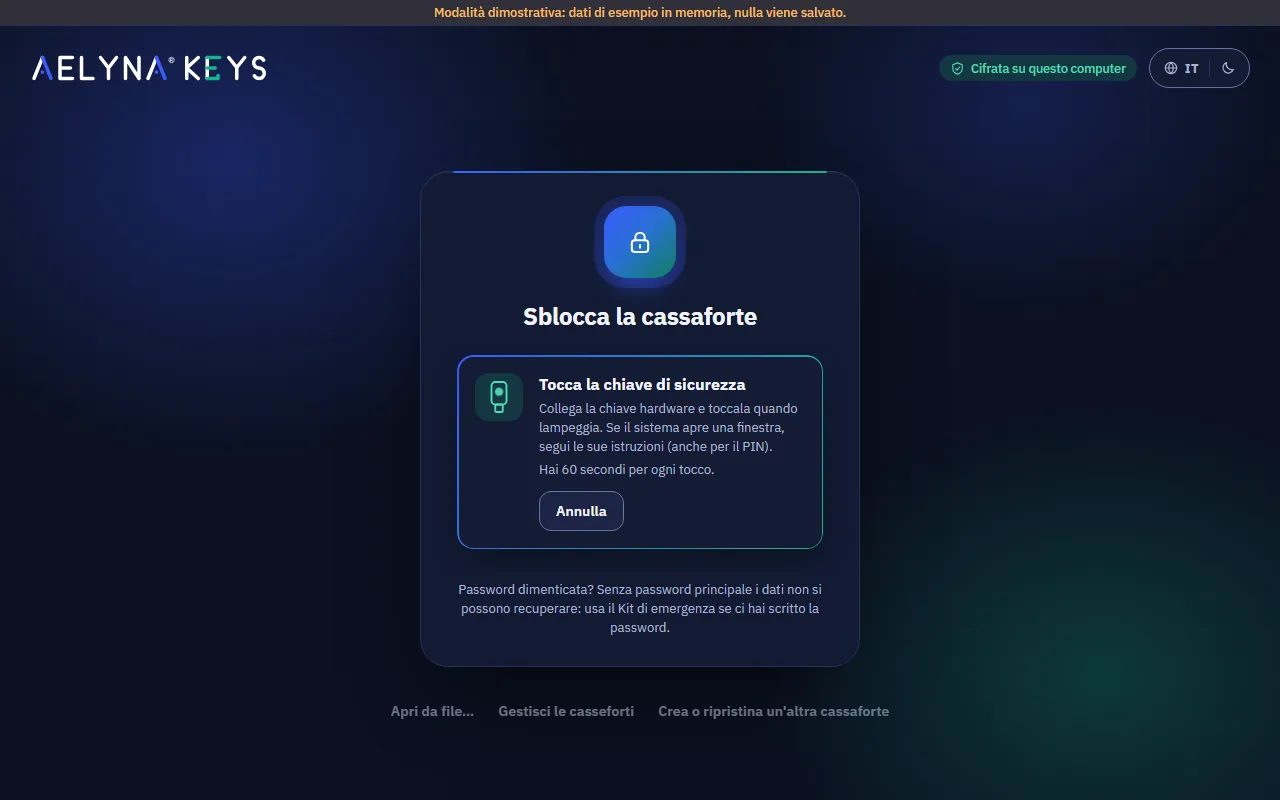
Type the password, press Unlock, then touch the key when "Touch your security key" appears. If you change your mind press Cancel: it does not count as a wrong attempt.
The recovery code
It is the only way to open the vault if you lose all registered keys. Keep it:
- on paper, away from the computer;
- apart from the Emergency Kit (not in the same envelope): anyone who had both the vault file and the code could open it.
If you have lost your keys: on the unlock screen press Lost your hardware key? Use the recovery code, type the code and choose a new master password. Then register a new key (recommended) or turn off the hardware key. The old keys, the old password and the old code stop working and you get a new recovery code.
If you fear someone has seen the code, create a new one from Settings → Hardware key → New recovery code….
Removing a key or turning off the protection
- Remove takes away a lost or replaced key. It needs a touch of another registered key. The last remaining key cannot be removed this way.
- Turn off the hardware key… removes all keys: the vault opens again with the master password and the Secret Key. It is less secure, and the app explains this before asking you to confirm.
Backup and restore
A backup is an encrypted .aelyna-backup file. The app reads it back
and checks it right after writing it, so you know it works.
Make a backup on an external drive or in a cloud folder: if the computer breaks or is stolen, it is the only copy of your passwords. If you have never made a backup, or the last one is more than 30 days old, an amber button at the bottom of the sidebar reminds you.
Creating a backup
- Tools → Backup → Create a backup.
- Choose the protection:
- Master password + Secret Key (recommended): for you;
- Separate backup password: to hand it to someone (a family member, your accountant) without revealing your master password. Choose a password of at least 12 characters. Note: with the hardware key on, this backup does not require it, and the app asks you to confirm.
- Press Create backup… and choose where to save it.
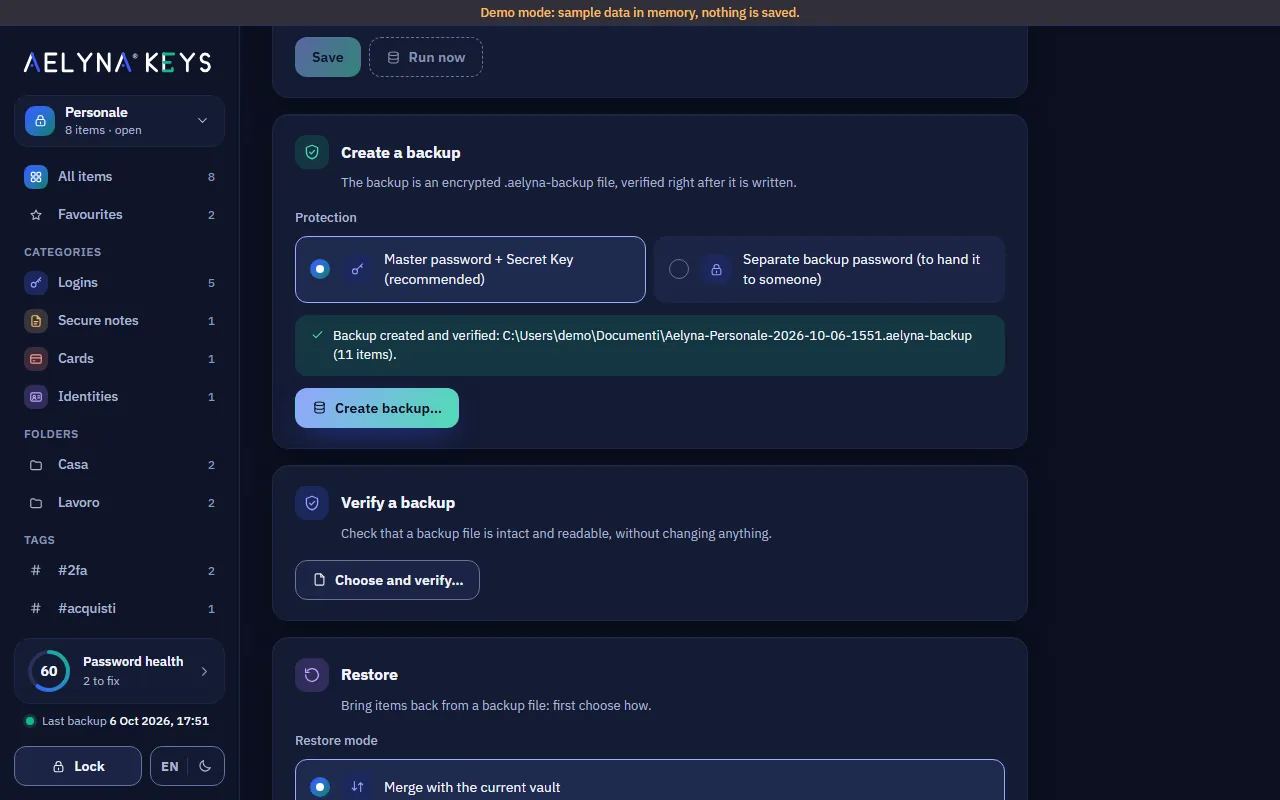
With Verify a backup you can check a backup file at any time.
Automatic backups
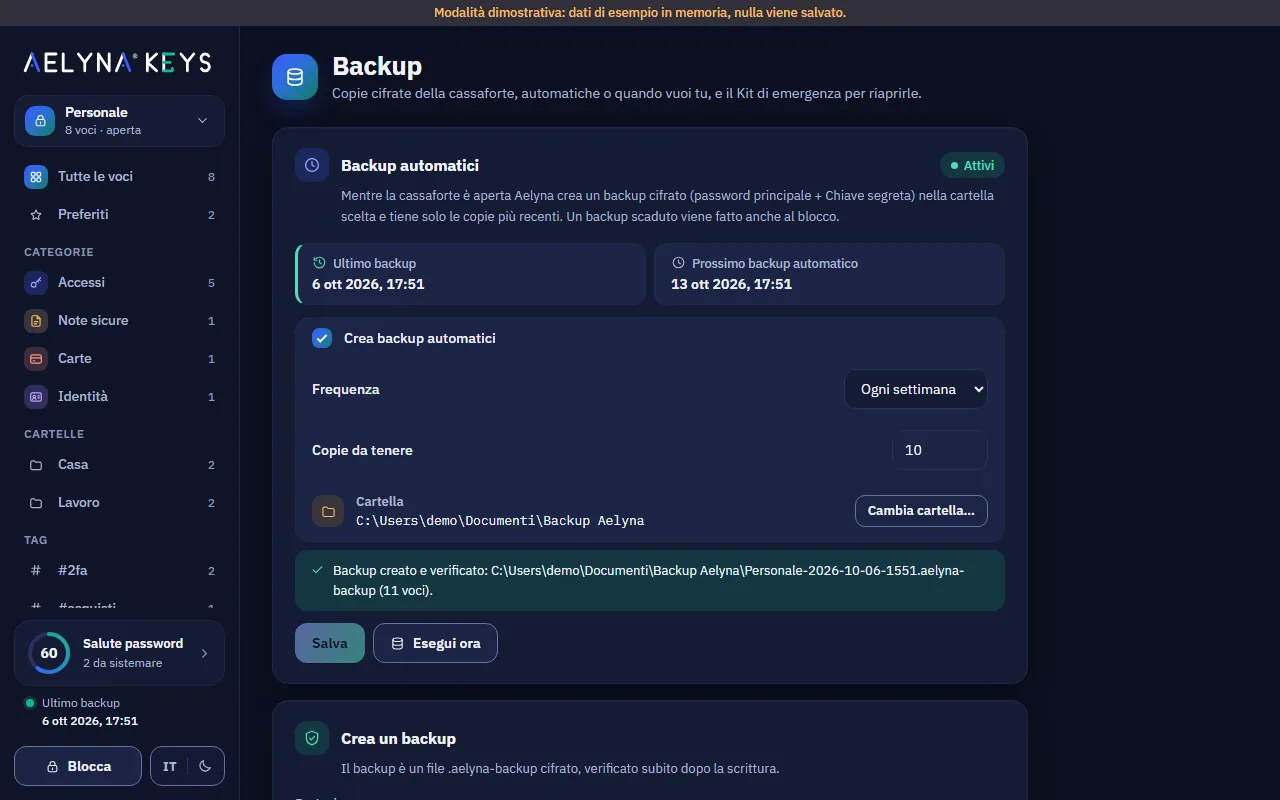
On the same screen, Automatic backups:
- turn on Create automatic backups;
- choose the folder (preferably an external drive or a folder synced with the cloud);
- choose the frequency (daily, weekly or monthly) and how many copies to keep (default 10: the oldest are deleted).
Automatic backups run while the vault is open and, if one is due, also when it locks. They always use the "master password + Secret Key" protection. Run now creates one right away. If the folder cannot be reached (drive unplugged) the app tries again after an hour.
Restoring a backup
On a new computer (or after reinstalling): at first launch choose Restore from a backup, choose the file and type:
- for a backup with master password + Secret Key: the master password and the Secret Key (from the Emergency Kit);
- for a backup with a separate password: the backup password and a new master password. You also get a new Secret Key: save a new Emergency Kit.
If the backup is protected by a hardware key, you will be asked to touch it.
Inside the open vault: Tools → Backup → Restore, then choose the mode:
| Mode | What it does |
|---|---|
| Merge | Adds the backup's items to the current ones; if an item is in both, the newer version wins and the other goes into the history |
| Replace | Replaces the current vault with the backup. A safety copy is saved first. It asks for the current master password |
| Create a separate vault | The backup becomes a second vault |
Importing and exporting
Importing from another program
Aelyna Keys imports from Chrome, Edge, Firefox, Safari, Bitwarden, 1Password, KeePass and from any CSV file.
- In the old program export the passwords to an unencrypted file (CSV, or JSON for Bitwarden, XML for KeePass).
- In Aelyna: Tools → Import and export → Choose the file to import….
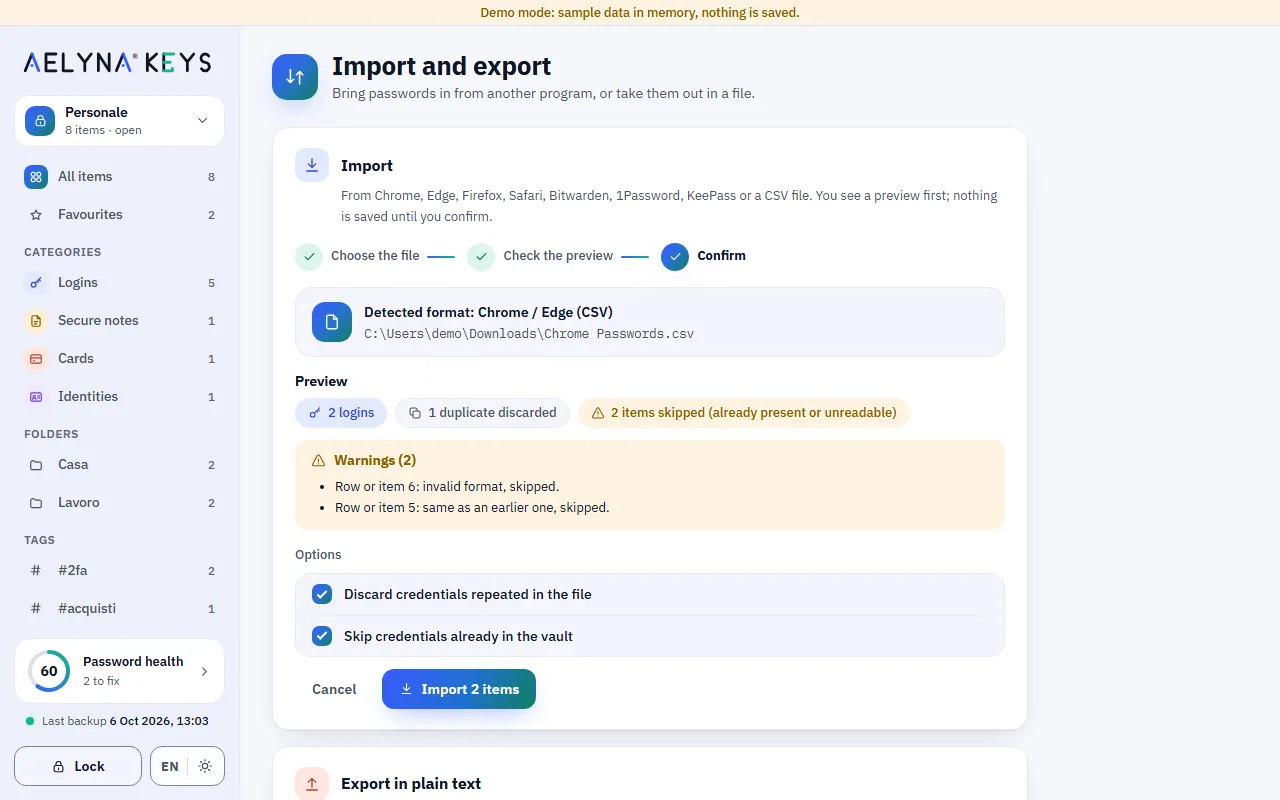
- The app recognises the format and shows a preview: how many items, any duplicates and warnings. For an unknown CSV you tell it what each column contains. Nothing is saved until you confirm.
- Press Import.
- Delete the exported file from the old program and empty the system trash: it is not encrypted.
Exporting in plain text
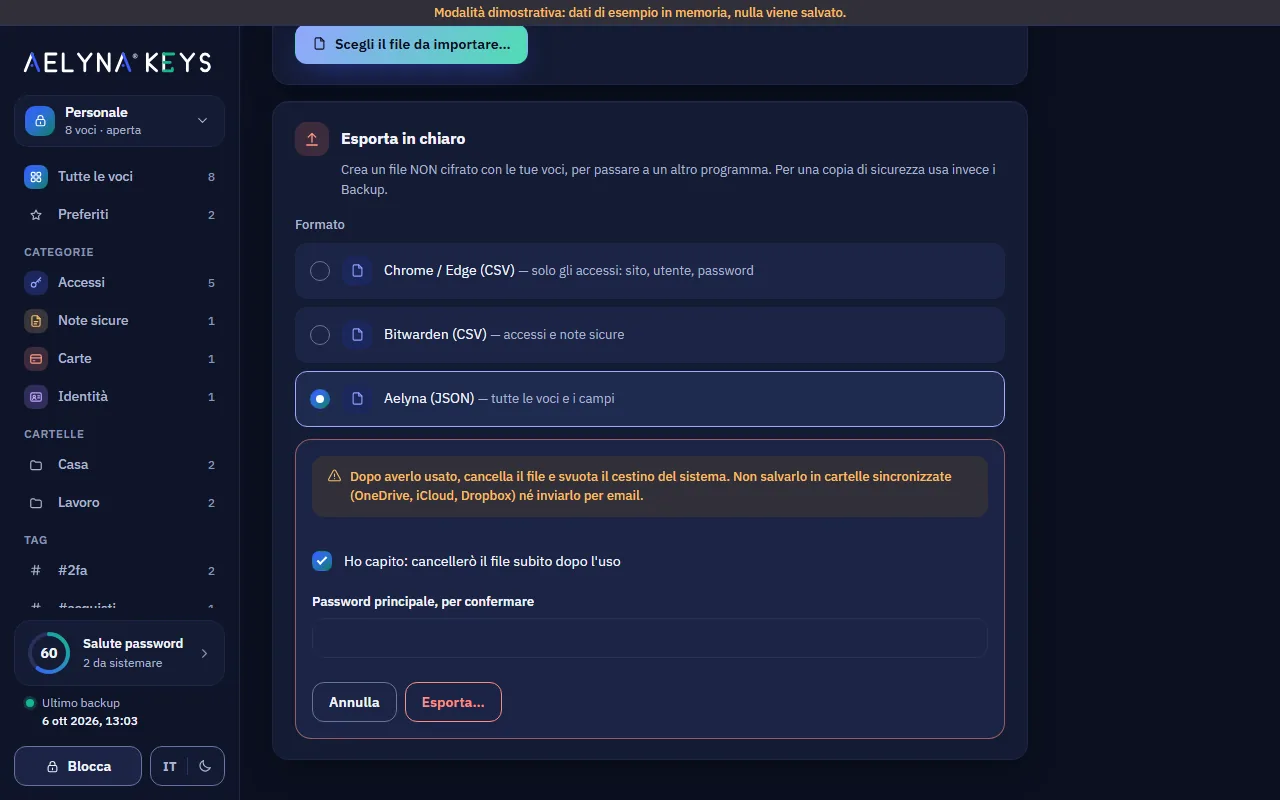
Export in plain text… creates an unencrypted file to move to another program. Anyone who opens it reads all your passwords, which is why the app warns you twice and asks for the master password. Delete it after use; do not save it in synced folders or send it by email. For a safety copy use Backups, not the export.
Password health
Tools → Password health checks your passwords on your computer and gives a score from 0 to 100. It flags:
- weak passwords, easy to guess;
- passwords reused on several websites;
- old passwords, not changed for more than a year;
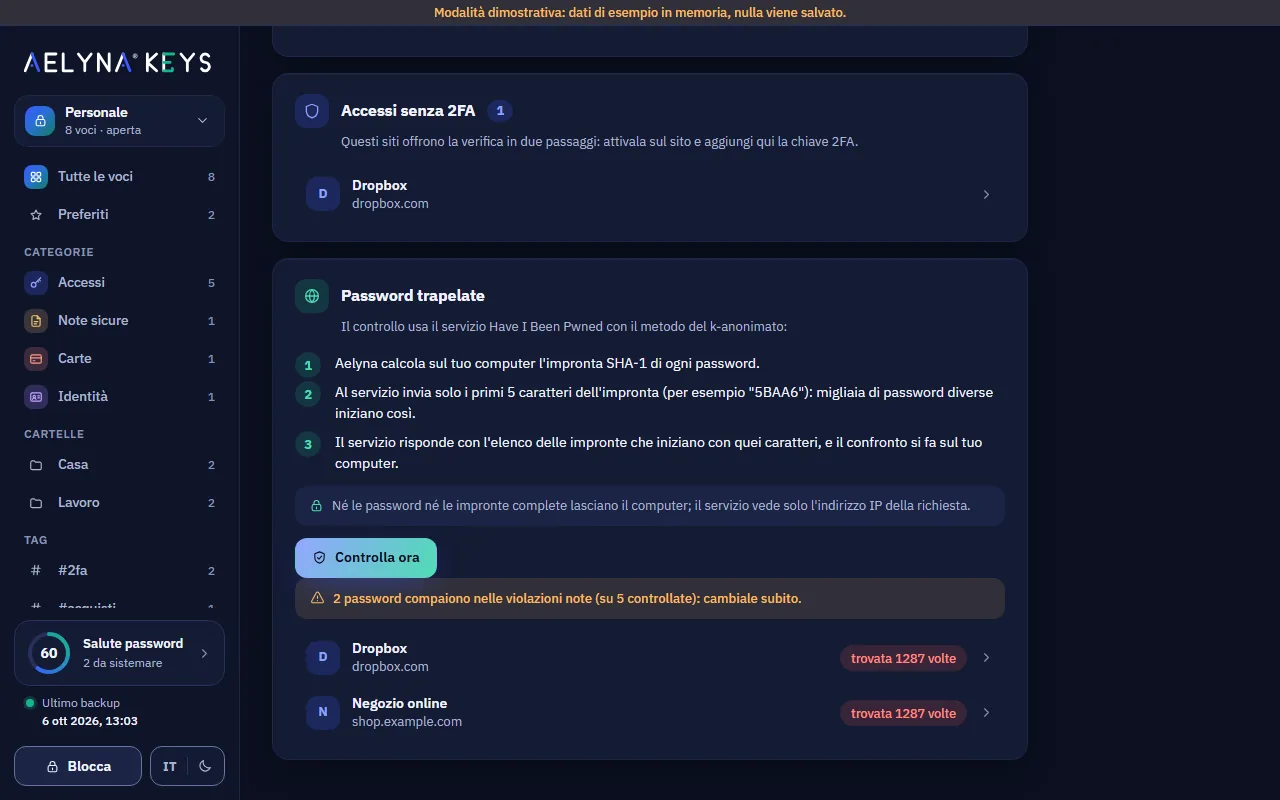
- logins without 2FA on websites that offer it.
Every flagged item is a link: open it and change the password (on the website and then in Aelyna).
Breached passwords (optional)
Aelyna can check whether your passwords appear in known data breaches, using the Have I Been Pwned service. It is off by default: you turn it on in Settings → Privacy and network, then you start it yourself with Check now. It never runs on its own.
How it works, in short: only the beginning (5 characters) of each password's fingerprint leaves the computer, shared by thousands of different passwords; the comparison happens on your computer. Neither the passwords nor the full fingerprints leave the computer. The service sees the IP address of the request.
Anonymous installation statistics
When checking for updates, Aelyna Keys sends a random code that identifies this installation (not you or your computer), along with app version, operating system, architecture, channel and language. It tells us how many installations are active and how quickly security fixes reach them. Nothing from your passwords is ever sent and our server does not store your IP address.
- It is on by default and you find it in Settings → Privacy and network → Send an anonymous installation identifier (and already in step 4 of the first run).
- The code is generated at random by the app: it is not derived from the computer, your name or the vault. Settings show it, should you want to ask for its deletion by email.
- Turning it off deletes the code from the computer and the app asks our server to delete it (if there is no network at that moment, it tries again at the next check). Update checks go on, without the code. Turning it back on creates a new code, not linked to the old one.
Password generator
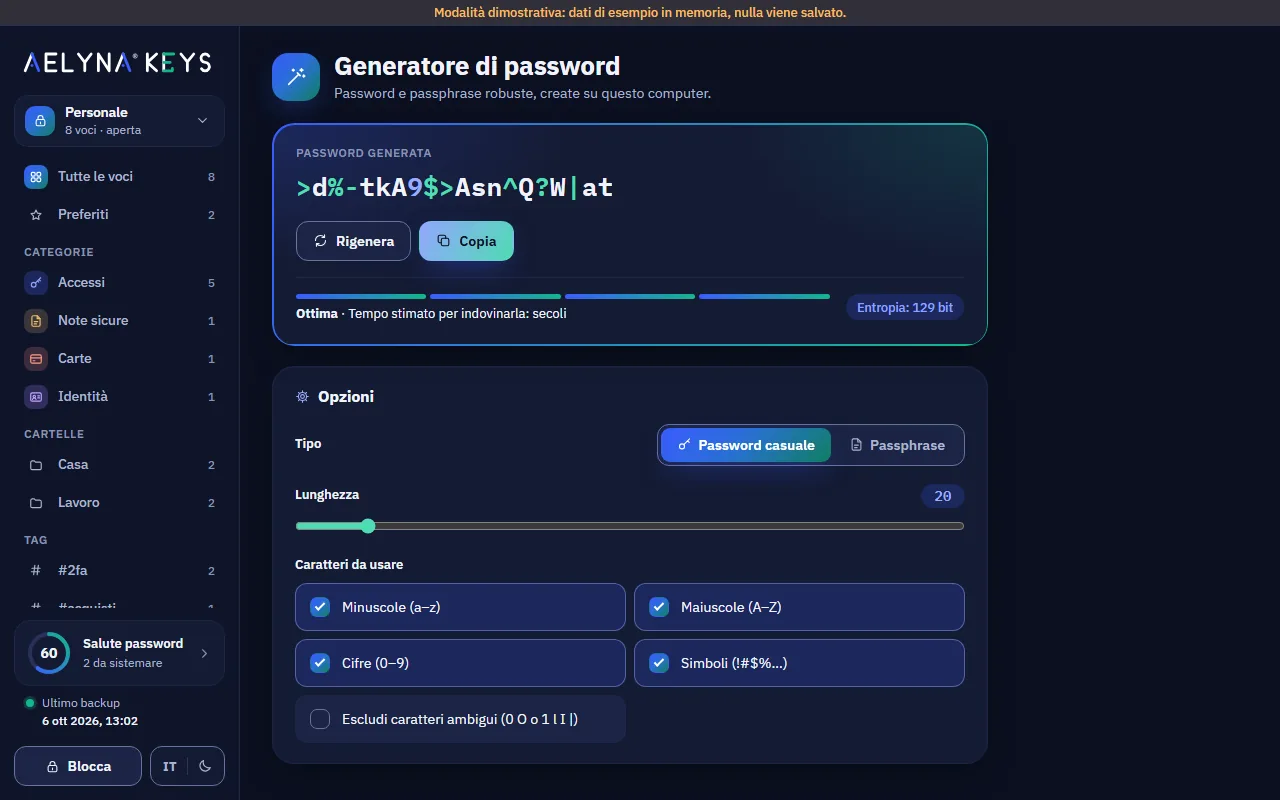
Tools → Generator creates:
- a random password: choose length, lowercase, uppercase, digits,
symbols and, if you like, leave out characters that look alike
(
0 O o 1 l I |); - a passphrase: several words (in Italian or English), with a separator, capital initials and a digit, if you like. It is ideal for passwords you need to remember, such as the master password.
The meter shows strength and entropy. Copy or Use this password (from an item's editor).
Settings
Tools → Settings (Ctrl+, or ⌘,):
| Section | What you can choose |
|---|---|
| Security and unlock | Lock after inactivity (from 1 to 60 minutes, or never); lock on sleep, on screen lock, on minimise; keeping the window out of screen captures and screen sharing; quick unlock with Windows Hello and how often to ask for the password anyway (from 1 to 30 days, default 14); changing the master password |
| Hardware key | Turn on, add a backup key, remove, turn off, new recovery code |
| Clipboard | After how many seconds to clear it (from 10 to 90, default 30) |
| Vaults | The known vaults: open another one, rename them, remove them from the list, open one from a file (see Multiple vaults) |
| Privacy and network | Breached-password check (off by default); anonymous installation statistics (on by default, with this installation's code) |
| Appearance and language | Language (as the system, Italian, English) and theme (as the system, dark, light). Language and night/day theme can also be switched on the fly with the two IT/EN and moon/sun buttons at the top right of the unlock and first-launch screens, and next to Lock in the sidebar: the choice is kept at the next launch |
| About | Version, website and trademark notice |
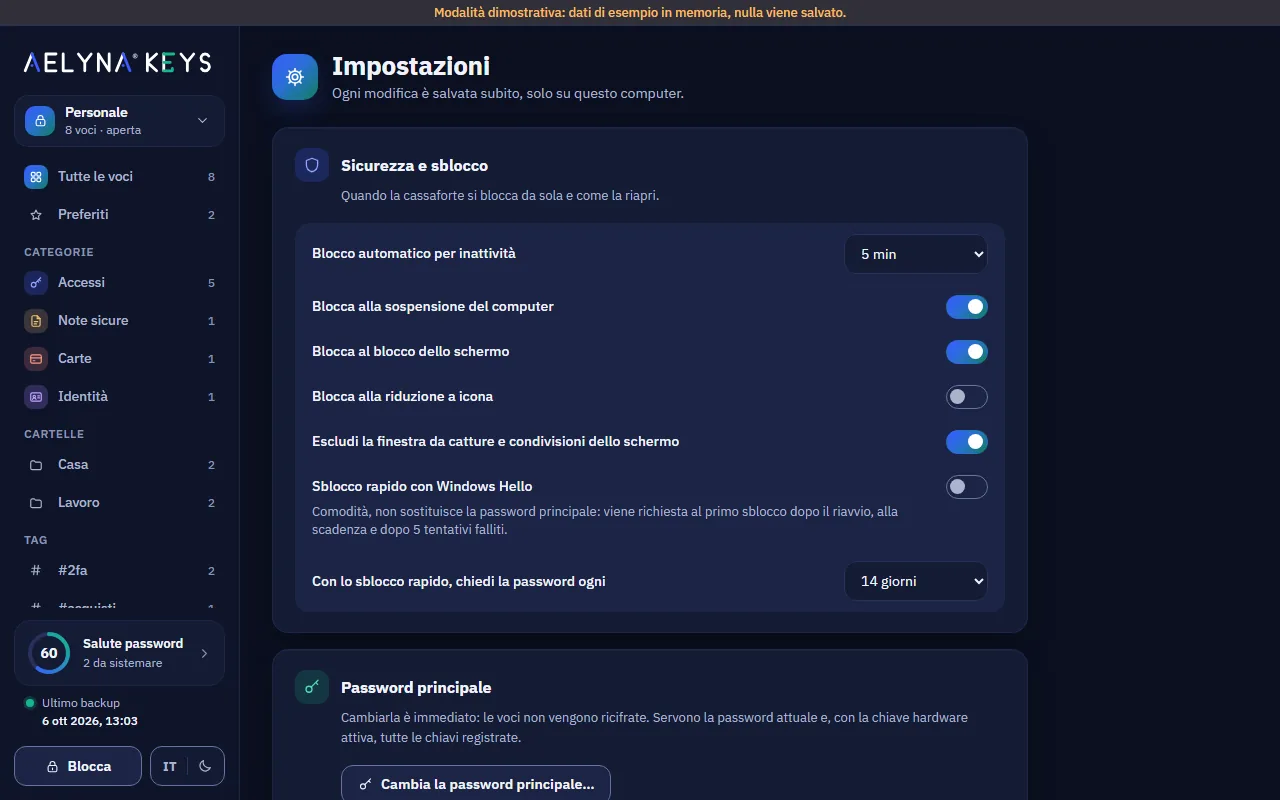
Our advice: keep locking on sleep and on screen lock turned on, and keep the window out of screen captures.
Not available in this version yet: quick unlock with Touch ID on macOS.
Updates
Tools → Updates shows the installed version and looks for new ones. Every update is signed and checked before installation: a tampered file is rejected. The update channel will be active from the first public release.
Keyboard shortcuts
| Action | Windows | macOS |
|---|---|---|
| Search | Ctrl+K or Ctrl+F | ⌘K or ⌘F |
| New item | Ctrl+N | ⌘N |
| Copy username | Ctrl+B | ⌘B |
| Copy password | Ctrl+C (with an item selected) | ⌘C |
| Copy 2FA code | Ctrl+Shift+C | ⌘⇧C |
| Show/hide password | Ctrl+R | ⌘R |
| Lock | Ctrl+L | ⌘L |
| Settings | Ctrl+, | ⌘, |
Lost something or have a question? Read the FAQ